Precision mechanical movement is an essential attribute of 3D printers. Stepper motors provide this control to many 3D printers thanks to their relative ease of use and competitive cost.
Desktop Factories: A ‘Moving' Look at 3D Printing
Mike Parks | Mouser
There is no other product that singularly captures the essence of the maker movement more than the 3D printer. It is difficult to describe the feeling you get when you use a 3D printer for the first time. It truly is a euphoric rush once you realize you have the ability to take a mere concept in your mind’s eye and bring it to a tangible reality. There are many technologies driving the plethora of additive manufacturing products available today including stereolithography, Selective Laser Sintering (SLS), Electron Beam Melting (EBM) and the most universally recognized Fused Filament Fabrication (FFF) method.
The workflow of 3D printing is straightforward. First we must capture our idea for a physical object in 3D modeling software either by designing from scratch or by the use of a 3D scanner. For most jobs that require precision modeling from scratch, scouring one of the dozens of websites catering to 3D model sharing is recommended. After we have a 3D object file we must translate from native format to an STL file format that can be imported into many 3D printer applications. Finally, the printer software slices the STL file into layers and generates “gcode” that is sent to the microcontroller that controls the printer's movement. Plastic is added layer by layer, until the complete object is brought to life.
One consistent design consideration of all 3D printers is in the motors and motor controllers to precisely maneuver the mechanical aspects of these marvelous tools. Here, we will focus on the Fused Filament Fabrication (FFF) type of printers that ‘transmute’ strands of plastics filament into physical objects. These are the type of 3D printers that some of us might own or at least have seen at a Maker Faire or a local makerspace.
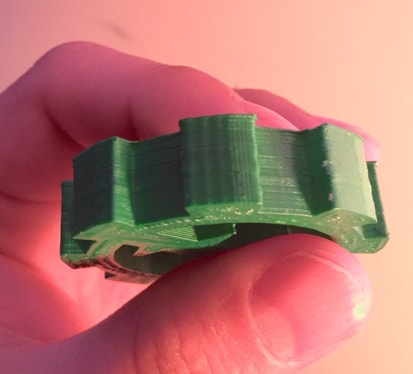
Figure 2: 3D printers build an object layer by layer
Stepper Motors
Regardless of design, all printers must move the extruder (the part where the plastic filament is melted and pushed out) in relation to the print bed (where the object sits while it gets built layer-by-layer).
To traverse the 3-dimensions (the X, Y and Z axis), motors are used to convert electrical energy to mechanical motion. Stepper motors drive nearly all consumer grade 3D printers.
There are various types of stepper motors, some requiring unique components to interface the motor with the microcontroller. The first way stepper motors are classified is by their National Electrical Manufacturers Association or “NEMA” number (e.g. NEMA 15, NEMA 57). NEMA 17 is a common stepper motor size for these types of applications; the number refers to physical dimensions for mounting the motor. It does not imply information about voltage, current, or torque properties.
Another fundamental differentiation between stepper motors is whether they are unipolar or bipolar, which relates to the windings and current flow of the motors.
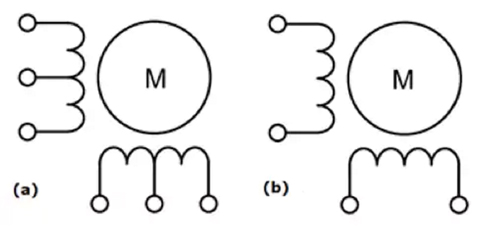
Figure 4: a) Unipolar stepper motor b) Bipolar stepper motor
Unipolar steppers can be driven in a pretty straightforward manner with a microcontroller and a few transistors. In the most basic type, a unipolar stepper has two windings (known as phases), each with a center tap. Current flows into the coil-end (alternating coil ends and phases as the motor rotates) and out of the common center tap. In short, the current always flows into one end and out of the center tap. That unipolar nature is what allows the microcontroller to directly drive smaller, low power stepper motors. For larger steppers that require more current, “gate” or “driver” transistors can be inserted between the microcontroller and the unipolar stepper motor. One disadvantage of unipolar steppers is that they produce comparatively less torque, since only half of a coil is energized at any one time.
At first glance, a bipolar stepper motor would appear to be more simplistic since they lack a common wire and thus have fewer wires. So from a motor construction perspective, a bipolar stepper is simpler, but from an electric operational view it requires a more complex control mechanism to reverse current flow through the coils. If needed, you can convert a unipolar stepper to a bipolar stepper by leaving out the common wire (see Figure 4 a: the center wire is the common.) To make the control interface simpler, H-bridge circuits are used and are available in convenient integrated circuit packages.
Motor Drivers
Interfacing stepper motors with the electronics brains of a microcontroller is often achieved with a circuit topology known as an H-Bridge. A popular integrated circuit that encapsulates this circuit is the L293D which contains two H-Bridge circuits. Four control signals from the microcontroller run to the L293D, two for each phase of the motor. Depending on the sequencing scheme, half-step or full-step, the microcontroller will energize the control wires in a defined sequence that the driver chip translates into output control signals that, in turn, are fed to the stepper motor. Sequencing schemes will affect motor performance. Full-stepping gives you greater speed, but half-stepping lets you control the steps with greater precision.
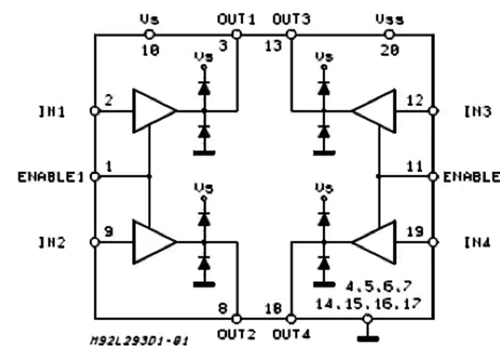
Figure 5: L293D H-Bridge Internal Circuitry
One important note is that the ‘D’ at the end of L293D signifies that it has built-in flyback protection diodes. There are also L293 chips that do not have the diodes, so be sure to pick the right ones when ordering. The diodes are key in preventing blowback voltage from the motor coils, which would likely fry your microcontroller. Blowback voltage results when the power to the relay coil gets switched off and the magnetic field starts to fade. Current can flow back into your microcontroller if you leave it unprotected without a diode.
Putting the Pieces Together
Precision mechanical movement is an essential attribute of 3D printers. Stepper motors provide this control to many 3D printers thanks to their relative ease of use and competitive cost. Integrated circuits such as the L293D make interfacing the stepper motors to the microcontroller much simpler and safer. It’s even possible to buy complete motor control solutions such as the gShield or grblShield. These are circuit board shields that plug into Arduinos that integrate multiple H-Bridge ICs and the power management circuitry which makes building your own 3D printer almost plug-and-play simple.
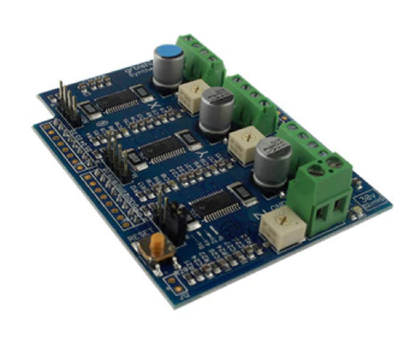
gShield is an integrated 3D printer controller solution
The content & opinions in this article are the author’s and do not necessarily represent the views of ManufacturingTomorrow
Comments (0)
This post does not have any comments. Be the first to leave a comment below.
Featured Product
