How GE Appliances uses ATOS 3D scanners, TRITOP photogrammetry, and ScanBox automated technology to solve engineering challenges.
Redefining Product Development Using Cutting-Edge 3D Metrology Solutions
Contributed by | Capture3D
How GE Appliances uses ATOS 3D scanners, TRITOP photogrammetry, and ScanBox automated technology to solve engineering challenges.
GE Appliances has been designing and manufacturing a full suite of consumer appliances—including refrigerators, ovens, dishwashers, freezers, washers, dryers, air conditioners, water filtration systems, and water heaters—for over 125 years.
The iconic brand is one of the most recognized household names for appliances in the United States. Its headquarters in Louisville, KY, employs nearly 6,000 people. A recent acquisition by Haier, finalized in June 2016, brought its total number of employees to 12,000 globally, making the company part of the largest appliance manufacturer in the world.
Part of the longevity of GE Appliances can be attributed to the company’s commitment to quality and technological innovation. In keeping with the company’s mission of improving life for consumers, the end user’s experience is always prioritized when designing and manufacturing appliances. Team leaders are encouraged to share manufacturing knowledge and insights with leaders from other industries to continually learn how GEA can optimize its manufacturing processes in order to build a higher quality product for the consumer.
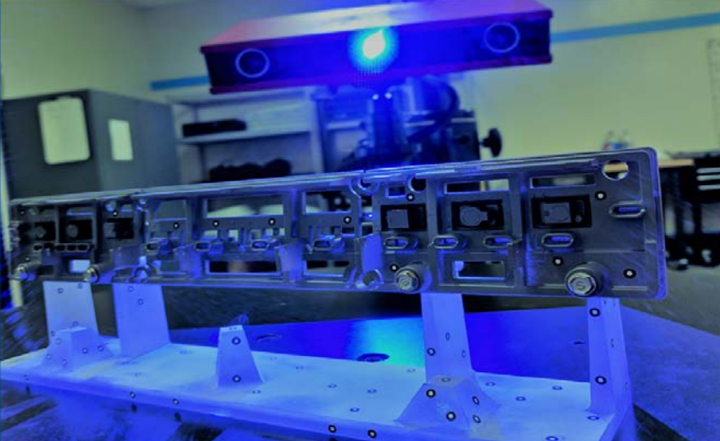
The ATOS blue light scanner uses optical non-contact blue light technology to collect millions of X-Y-Z coordinate points in high-speed scans.
In sharing knowledge with a partner, GE Appliances was introduced to precision optical metrology systems distributed by Capture 3D, the exclusive North American certified partner for GOM GmbH. Previously, GEA was using traditional CMMs (Coordinate Measuring Machines) and handheld or mounted laser scanners for part inspection. When engineers from GEA saw ATOS and TRITOP from GOM in action, they knew that adding 3D metrology capabilities would improve their processes and efficiency significantly.
ATOS is a precision 3D scanner that uses optical non-contact technology to collect millions of X-Y-Z coordinate points in high-speed scans. The projector in the center of the 3D scanner projects a fringe pattern onto the object being measured using structured blue light. Two high resolution measuring cameras on each side of the projector capture the fringe pattern during each scan, using the displacement to calculate the 3D coordinate measurements. Each scan collects millions of data points in a given volumetric area, and, in the end, produces an accurate and dense point cloud of the object.
Unlike a traditional CMM, which provides a one-dimensional chart of data points at each location the probe was programmed to touched the surface of the object, ATOS creates a 3D visualization of the entire part’s shape without any programming resulting in a complete inspection color map that indicates areas that fall within the proper tolerances as well as areas of deviation. In comparison to a handheld laser scanner, ATOS is faster for larger parts and less dependent on operator technique, leaving little room for stack up error.
GEA often uses ATOS in conjunction with TRITOP for larger appliances for even greater accuracy because it creates a global reference to eliminate stacking error across larger complex objects. TRITOP is a hand-held photogrammetric technology that obtains measurements using as single high-end camera to snap pictures of the object from various angles. Using the principles of triangulation—the same principles that are used in calculating ATOS measurements—precise points are calculated onto the 3D coordinate plane. TRITOP can also be used as a standalone measuring system for inspection and deformation analysis.
Accuracy, data resolution, software integration, and quality make the ATOS and TRITOP unique in the non-contact 3D metrology market. The software automatically aligns each scan, allowing for less scans overall and reducing lead times.
After conducting initial scans through partners, GEA made its first purchase in June of 2016.
“It was easy to make the business case to purchase the systems,” said Dave Leone, Director of Dimensional Control for GE Appliances. He noted that his team was instantly able to start driving improvements. Leone views the GOM systems as more than just a stand-in for the traditional CMM. He describes ATOS as a powerful engineering tool.
“If you can digitize a part, there’s a lot you can do with that data,” he said. “We saw it as an opportunity to close the loop between virtual and actual, and take actual and put it back into CAD space. 3D scanning has really opened our minds to leveraging the power of digital data.” ATOS and TRITOP have been used for part inspection, large scale digital assembly studies, tooling inspection, reverse engineering and virtual reality rendering, to name a few.
Part inspection and assembly analysis for product development and quality control is the main focus, as GE Appliances has been using the ATOS and TRITOP systems as diagnostic tools to pinpoint specific dimensional issues to make improvements before production.
ATOS in Action: Root Cause Analysis
In one instance, a pre-production top load washer basket had excessive runout which can cause vibration. GEA used ATOS and TRITOP to perform a root cause analysis. First, GEA’s metrology team scanned the basket to dimensionally compare it to the CAD file. The bright green 3D model indicated very little form error and that the part matched nearly perfectly—no issue there.
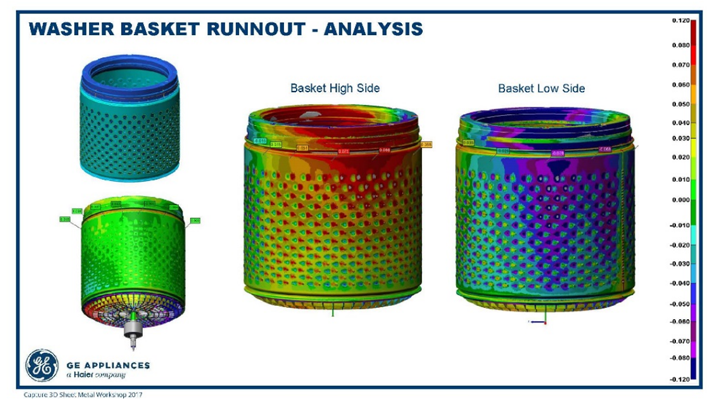
The initial scan of the washer basket (left, top and bottom) revealed that the basket form was within tolerance. When the basket was aligned to the functional datums in the software (right), the runout was revealed.
Next, the washer basket was aligned virtually to the input shaft, which holds the basket in place, in the GOM software. That alignment indicated that the basket had a high degree of orientation error causing a runout condition—too high on one side, too low on another. The GEA team decided to collect detailed data from the entire assembly to discover the root cause, and added in TRITOP photogrammetry to achieve higher accuracy over the larger surface area to be scanned.
Engineers used TRITOP to shoot the assembly in its entirety for a global reference, and then used ATOS to scan each part individually, creating a digital assembly by combining all of the data. Digital assembly allows data from scanned parts to be integrated with data from CAD nominal parts for the purposes of comparison and analysis, in order to diagnose assembly, fit, form and function issues. Using this method, the GEA team discovered that the problem stemmed from the aluminum hub that is integrated in the base of the washer basket. The part, which goes through an overmolding process, was misaligned.
Scan data of the aluminum hub was aligned to CAD data of the overmolding tool in the GOM software. By taking a cross section of the data, GEA engineers could see that the form error of the part created gap between the tooling pads, causing the part to be overmolded at the wrong orientation. From there, the tooling pads were adjusted to correct the part alignment to achieve an overmolded part within tolerance. By adjusting the datum scheme of the tooling pads used in the overmolding process for the aluminum hub, and correcting its orientation, the runout issue was resolved.
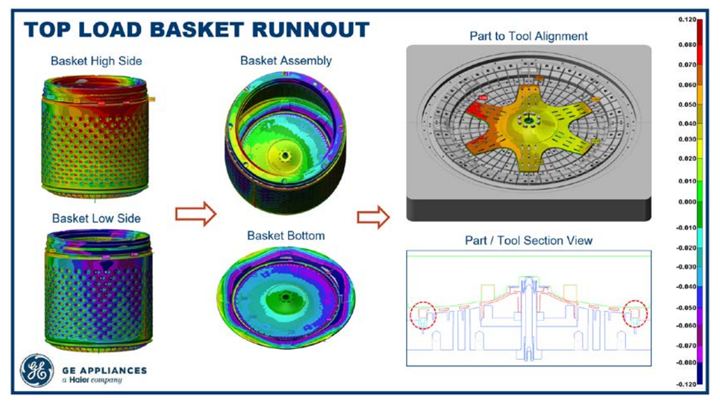
All parts of the washer were scanned and the issue was traced to the aluminum hub that is overmolded in the base of the washer basket (top right). When the actual scan data of the part was aligned with the tooling pads, engineers could see the part was misaligned in the tool (bottom right). The tool was changed and the runout was fixed.
The solution may have been a small fix, but the diagnostic process would have been complicated without the GOM systems. TRITOP, ATOS and the GOM software integrate together to provide not just data, but a full picture of each part and how they relate with one another. In this case, the data collected previously with a traditional CMM was misleading and didn’t highlight the issue with the parts. “CMM data can be very inconclusive,” Leone said. “You end up using the scan data to show what you really have, because the scanner doesn’t lie. Additionally, with CMM’s if you don’t probe it you don’t know it. We let the scan data highlight the problem areas.”
Perfecting a Prototype with Digital Assembly
One of the main advantages of the GOM solutions is receiving high quality, incredibly detailed data— and receiving it fast. GEA used TRITOP in conjunction with ATOS to create multiple digital assembly studies for a new refrigerator program.
GEA shot four TRITOP photogrammetry sessions for the refrigerator—one shot of the outside of the closed refrigerator, one of the case alone, and one for each door assembly—at each step of the development process. Using common reference points, a full digital assembly of the appliance was created. Smaller parts were scanned using the ATOS system and added to the digital assembly. Engineers used the data to understand dimensional contributors of the assembly, measure gasket compression, door alignment, and to isolate individual sections and determine which areas needed improvement.
The first digital assembly for the initial design guidance prototype build revealed a large area on the outer door that deviated from CAD nominal. The outer door appeared bright red on the inspection color-map, indicating that refrigerator door had expanded beyond tolerance.
Engineers realized that this issue appeared after the foaming process that the door goes through. Each refrigerator door is filled with foam for insulation and the foam is shot into the door and expands, then hardens. In this case, the prototype foam fixture that was used in the process wasn’t rigid enough and was expanding too much, which contributed to the excessive door thickness.
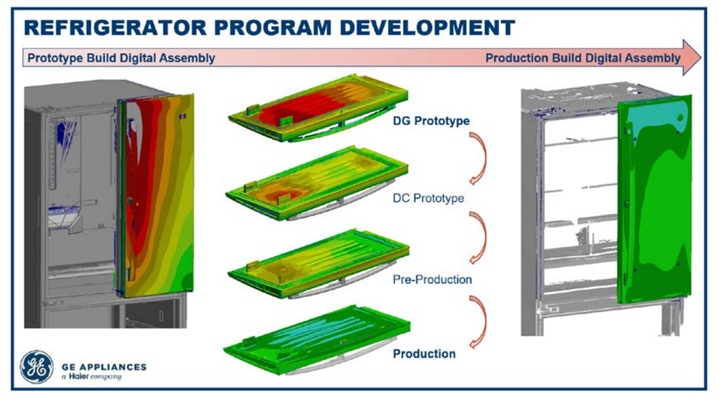
GEA engineers used TRITOP photogrammetry to create a digital assembly of pre-production refrigerators. The first scan (top) of the design guidance prototype indicated that the door did not meet tolerances. Root cause analysis traced the issue to the fixture used in the foaming process. Subsequent scans provided fast feedback and fixes were made to approach CAD nominal in the final production scan (bottom).
When engineers realized the problem and put additional support on the foam fixtures, “their parts got really good, really fast,” said Leone. “We were able to give them fast feedback” which resulted in a faster improvement in quality.
Leone said that if the GEA metrology team was using a CMM, they wouldn’t have even been able to provide the kind of detailed measurement information the TRITOP and ATOS systems collect. Now, they can give that kind of information in a week or even a few days. Subsequent photogrammetry shots and blue light scans throughout the rest of the refrigerator development process allowed the team to drive toward CAD nominal and produce a higher quality product.
Reverse Engineering, Virtual Reality Rendering and More
GE Appliances has also used the systems for reverse engineering applications in situations where CAD data isn’t available. In one instance, their CAE team wanted to run a CFD analysis (Computation Fluid Dynamics) on a fan design. Unfortunately, the CAD data was not available so the CAE team turned to the metrology team to use the ATOS system to digitize the part. After scanning the fan at high resolution and some additional post processing, the CAE successfully completed the analysis using scan data.
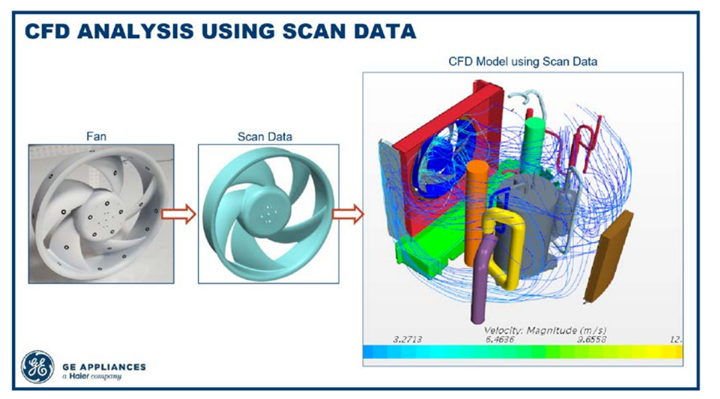
The fan, on the left, did not have CAD data available for the CFD analysis, so reference points were applied and it was scanned (middle). The CFD model was created using the data obtained by the ATOS system.
A common practice in manufacturing is studying competition to further drive innovation and product development to the next level. In order to do so, parts from competitors are scanned, too. Those parts can be scanned to produce a CAD file and then 3D printed for testing. GEA has also scanned entire appliances from competitors to create a digital replica in the company’s virtual reality lab. The styling of the competitor’s unit can be compared with the styling of one of GEA’s proposed designs in the virtual reality space, which can adjust lighting, finishes, color and more.
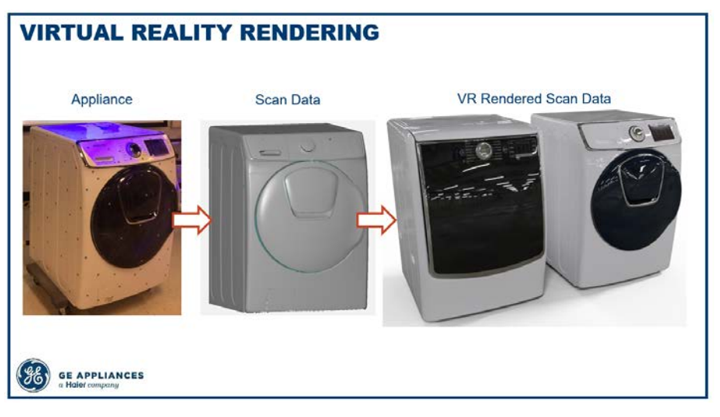
GE Appliances put reference points on a competitor’s washing machine (left) and scanned it to obtain CAD data (center). On the right, the virtual reality rendering of the competitor’s unit appears next to a unit from GE Appliances.
The GOM solutions are like a “Swiss Army knife” according to Leone. “We just kind of keep coming up with uses for it.” GEA has also used ATOS and TRITOP for thickness analysis studies, clearance studies, door closure studies, virtual assembly, volume analysis, moldflow simulation validation, refrigerator thermal bow analysis, tooling and equipment validation, and digital archiving and more.
As of 2018, GEA has seven ATOS scanners, three TRITOP photogrammetry systems and four automated rotation tables for rotating the part as it’s being scanned. The company also recently acquired its third ATOS ScanBox. The ScanBox is a plug-and-play, automated 3D scanning inspection cell for in-line or near-line measurement that includes the ATOS scanner, robot, rotary stage, software and optional photogrammetry integration. One of the benefits of the ScanBox is the VMR (Virtual Measuring Room) software that automatically programs the measurement routine offline and online. This also integrates with a touch-screen Kiosk, bar code and RFID readers.
Leone said that the adoption of 3D scanning has contributed to the growth of the innovation culture at GEA, too. “It’s created this acceleration of learning and technical growth,” he said. Partnerships with other companies, benchmarking and sharing best practices have caused GE Appliances to embrace other new technology—and question the limits of older technology—in other areas as well.
The content & opinions in this article are the author’s and do not necessarily represent the views of ManufacturingTomorrow
Comments (0)
This post does not have any comments. Be the first to leave a comment below.
Featured Product
