There are many factors to consider when deciding on a vision system in your automation system. Three of the biggest are hardware, lighting, and lenses.
 Machine Vision System Factors

Glenn Himawan, Senior Engineer | Patti Engineering
Hardware
Machine Vision sensor resolution
How does the sensor resolution affect my machine vision?
The sensor’s job is to capture light and convert it to a digital image balancing noise, sensitivity, and dynamic range. The size of the sensor determines how big of an area the light can be captured on the sensor and the resolution of the sensor determine how many pixels it can process. If the sensor is too small, the vision system will have a hard time capturing the light. If the resolution is too small, there could be too few pixels to process. When that happens, the image processing result can be unreliable.
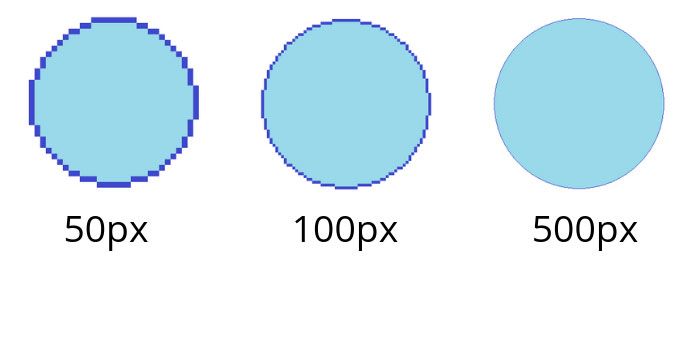
The image below shows the difference between low, mid and high-resolution image. PPI (pixels per inch) measures the number of pixels per inch line in an image. The image below shows an extreme example of how resolution can affect an image.

What’s the best resolution for my vision process?
It depends. It depends on the area of the part you want to capture and process. Bigger is usually better, but it will cost more to purchase a bigger resolution camera.
Lighting
Why is lighting important?
Lighting is one of the most important parts of machine vision process. Machine vision does not analyze features of the object itself but rather analyzes the light reflected by an object. To enhance parts of the object or negate others, lighting setting can have a huge impact.
What is the best lighting setting?
Once again, there is not one best lighting setting. The best lighting setting is a setting in which the machine vision can analyze features of an object you want to analyze – and negate features you don’t want to analyze.
How to get the best lighting setting?
To get the best lighting setting, there are several key aspects to remember when adjusting lighting.
Power/Diffusion
Power and diffusion are two different aspects, but they correlate to each other. Power will determine how much light is reflected by the object to the camera. Diffusion determines how much of that power spreads to how much area. The image below shows how diffusion can spread the light between areas and how diffusion can enhance features and negates some other area. Depending on your scenario, maybe the first image is more appropriate for your application since you want to negate some features, but you want to enhance other, or an application needs all area to be equally bright, then the third example is more appropriate for your application.

Position/angle
Lighting position will determine parts of the object you want to enhance and parts of the object you want to negate. Unless you use a diffused light, lighting an object will create a shadow thus negate parts of the object so it won’t be processed and it also enhances parts of the object you want to be processed.
Color
Color is one of the most important aspects of lighting but it also one of the things people forget about. The color of the light could enhance parts of the object without moving the object or the light source.
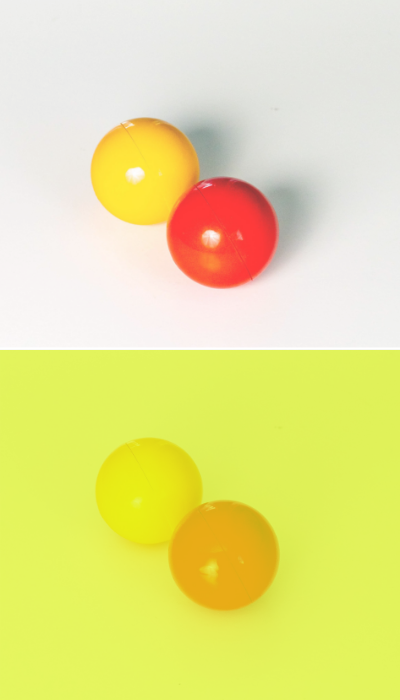
For example, in the pictures below, the yellow light filter makes the red ball stand out much more in comparison. This could help parts of a logo stand out, for example.

Lenses
What’s the purpose of a lens?
Lenses determine the field of view of your image. The wider lenses you have, the more area you can process. More close-up of a lens gives you more pixels to work with on a smaller part of the object.
What’s the best lens to use?
The answer to this question depends on your application. There are 3 criteria that I ask when looking at an application:
Area
The best lens is the one that covers all of the area you want to process but also still has enough room for vibrations, out of focus tolerance, etc. My preference is to have a lens that covers 1.35x of an object area so it still is able to cover vibrations and a little bit of movement.
Camera resolution
The clarity of the lens is the difference in optics. If you have a larger megapixel camera, using a bad optic will result of bad image or blurry image.
Distance
Distance between the lens and the object is important because every lens has a focus limitation. Some lenses will have a higher magnification rate, and thus will be able to get in focus even at a closer distance to the object.
Considering all of these factors will help you choose a system that works smoothly for your system. There are some cases when it might be better to not use a vision system at all!
The content & opinions in this article are the author’s and do not necessarily represent the views of ManufacturingTomorrow
Comments (0)
This post does not have any comments. Be the first to leave a comment below.
Featured Product

